
Hi there! With the RG351P comfortably launched and now within the hands of many, we at DroiX felt it would be useful to the community at large (customers or not) to provide a simple guide on installing RG351P Firmware.
When tinkering about with the device’s various features and settings, you may toggle something that you’re unsure how to reverse – after hours of troubleshooting, you might just wish to reset the whole system with stock firmware for the RG351P.
The good news is that this process is exactly the same as its predecessors. Obtain the image file, and use software of your choice to write it to the SD card.
The bad news is that because the RG351P only uses one SD card for both the operating system, and the storage of games, flashing it -will- remove any games you added to the system after receiving it. This is different to its predecessors wherein the operating system and the games could be kept on separate cards.
With that in mind, let us continue.
You Will Need:
- A microSD card of at least 64GB in size.
- The RG351P stock firmware.
- You can download a copy of the image the RG315P shipped with in September 2020 here: https://go.droix.net/RG351-FW
- A PC or Laptop capable of reading and writing to an SD card
- If your PC or SD card doesn’t have a microSD card slot, a USB card reader will be perfectly fine.
- Win32DiskImager – https://sourceforge.net/projects/win32diskimager/
- 7zip – https://www.7-zip.org/
Combining the split zip files
Because the stock image for the device is very large, we have split it into multiple parts to make the download more stable (this way, if something happens, you won’t have to redownload an entire 64GB file from the beginning). You will need to combine the split parts using image compression software of your choice. We suggest 7zip, as it is free and lightweight.
Once all 5 parts are downloaded and you have installed 7zip, right click the first one, and extract it. Like so:

An image file should then appear in the folder, which can then be used to flash a card.
05/07/2021 Update – Due to issues with the files becoming corrupted, we have now switched to providing a single .img file. Please disregard this section!
Preparing an SD card
We’d advise formatting your SD card first too.
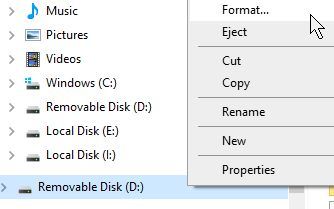
To format it, insert the SD card into your system, then right click it in File Explorer. Select “Format” from the context menu.
Make sure the card is formatted as NTFS, then click format.
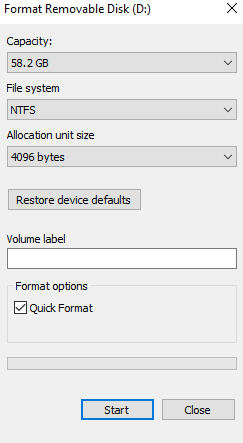
Now your card is ready to be used.
Flashing the Card
For this guide we’ll be using Win32 Disk Imager. A lightweight program that can be used for both the writing and reading of image files and external storage devices.
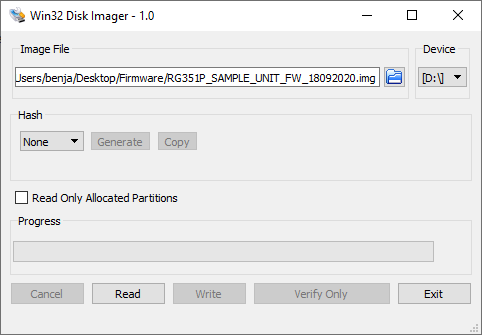
Once you’ve opened up Win32 Disk Imager, click the blue folder and navigate to wherever you saved the image file for the RG351P, then select it.
Make sure the device’s drive letter matches up with the SD card.
Then once ready, click “Write”. The program will then proceed to write the image file to the SD card.
Please refSn from removing the SD card, or closing the application during this process, as it will cause the operation to fail, meaning you’ll need to start the flashing process again.
Once finished, you can then safely remove your SD card and insert it into your system. Your RG351P will then boot up with a fresh installation.
We hope this guide has proven helpful! If you have any further questions or issues, please feel free to leave a comment, or shoot us an email at [email protected].
For the RG351P and other retro gaming handhelds, please check out our website here: https://droix.net/products/rg351p-retro-gaming-handheld
