


Welcome! We at DroiX recently started selling the popular Retroid Pocket 2 retro gaming handheld. The Retroid Pocket 2 comes with Android 6.0 installed, but there does exist an official update to Android 8.1, so we felt it would be helpful to create a guide that walks you through the process. Read on to find out how to install the Retroid Pocket 2 update!
The Retroid Pocket 2 is set apart from it’s contemporaries in the “retro handeld” space by being one of the few devices that runs Android. This makes it slightly more involved to update or install custom firmware compared to devices such as ANBERNIC’s RG351P, for which updates are just a matter of flashing an SD card.
There are some differences between Android 6.0 and 8.1 (in terms of app compatability, etc.), so you might not feel as though an update is necessary. If not, you can also use this guide as a way to simply re-flash the device. For those unfamiliar with android devices, “flashing” is just another term for installing firmware on the device. In this context, it is like reinstalling Windows on your PC. A useful troubleshooting technique.
You will need a Windows PC or Laptop, a USB A-to-C cable, and you will also need a fair few files before starting, which are all as follows (most of these files can be found at -> this link <-):
- Retroid OS Backup Software – RP2 Key Backup Tools.zip
Software for backing up the unique Retroid OS key for your device. Without this key, you will not be able to receive OTA updates from Retroid, or access the full features of Retroid OS. - SPFlash – SPFlashWin.1832.zip
The software we’ll use to install the updates. - The Actual Firmware – RP2-6.0v5.zip (Android 6.0) OR RP2-8.1v3.zip (Android 8.1)
You can choose between Android 6.0 (what is already installed) or Android 8.1 (the update). - Google’s Android USB Drivers – usb_driver_r13-windows.zip
Without these, your PC will not be able to connect to the Retroid Pocket 2. You can also grab these directly from Google here: https://developer.android.com/studio/run/win-usb - MediaTek Preloader Drivers – MT65XX-Preloader-drivers.rar
Required for SPFlash to operate in conjunction with the Retroid Pocket 2. - File Archival Software – https://www.7-zip.org/
Most of these files are .zip so they can be opened natively in Windows 10. For anything else however (.7z, .rar, etc.) you’ll need specialized software. We suggest 7zip, as it is free, open-source, lightweight, and non-intrusive. You can use alternatives such as WinZIP and WinRAR if you wish however. - A stock SD card – https://droidboxforums.com/threads/stock-sd-card-for-retroid-pocket-2-download-link.22039/
You’ll need the SD card in the unit to be loaded up with the stock files (Retroid OS-related things primarily)
WARNING: Please ensure that you follow this guide exactly. If you use the wrong files, disconnect the device during the process, or otherwise fail to follow the outlined steps in some form. You risk bricking your device and rendering it inoperable. DroiX is NOT responsible in the event this occurs.
Now that you have all the files, we’ll get this guide started.
1. Install the Drivers
Download and install the Android USB and MT65xx Preloader drivers.
Installing Android Drivers (usb_driver_r13-windows.zip)
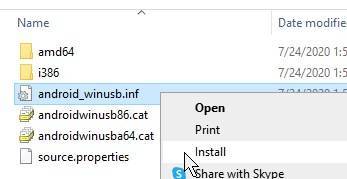
Extract the zip file, then right click android_winusb.inf. Click install.
You will probably see a pop-up window requiring you confirm the installation. This is just a security measure (you should only install apps from trusted sources). Click “Install”.
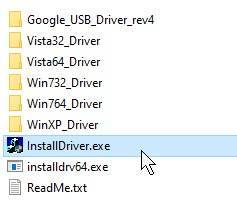
Installing MediaTek Drivers (MT65XX-Preloader-drivers.rar)
Download, extract the zip file, then click “install.exe”. The drivers will install, you’ll get a short message confirming they’re installed, and you’re good to go!
(If you get a warning indicating that the drivers may not have installed correctly – ignore it)
Back Up The Retroid OS App Key
First, download the backup tools (RP2 Key Backup Tools.zip). Extract the contents.
Then, power on your Retroid Pocket 2 and enable USB Debugging. You can do this by:
- Open Settings
- Scroll down to the System section, select “About phone”
- Select “Build number” 7 times. You’ll then get a notification that “You are now a developer”
- Back out to the main Settings menu, and “Developer options” will now be available. Select it.
- Scroll down and make sure “USB debugging” is enabled.
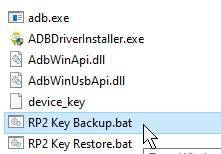
Now connect your Retroid Pocket 2 to your PC. Open the backup tools folder, and double click the “RP2 Key Backup.bat” file to run the backup process. If successful, a “device_key” file will be generated.
Flashing The Firmware
Important: Make sure that your Retroid Pocket 2 is powered off during this step, and that the stock SD card (or a card you’ve prepared with the same files) is inserted.
First, download the firmware for Android 6.0 (RP2-6.0v5.zip) or Android 8.1 (RP2-8.1v3.zip) respectively. Extract them.
Download, and extract SPFlash (SPFlashWin.1832.zip). Then run flash_tool.exe to open the software. You’ll be met with a screen like this:

Under “Download-Agent”, select the “MTK_AllInOne_DA.bin” file, this will be found in the SPFlash folder.
For Scatter-loading File, navigate to the 6.0 or 8.1 firmware folder you downloaded previously, and select the “MT6580_Android_scatter.txt” file.
Now depending on what firmware you have here, the next step will differ.
- For the drop-down box (see under “Authentication File“, if you are changing to a different Android version (i.e., 6.0 -> 81.), select “Format All + Download“
- If you are re-flashing or updating to the same version, change the box to “Download only“, then scroll down the list of options and uncheck the “userdata” option.
Now click the “Download” button at the top of the program. You can then connect your powered-off Retroid Pocket 2, and the process will automatically carry out.

Once finished, disconnect your Retroid Pocket 2 from your computer. It will not boot if it is connected.
Restore the Retroid OS Key
Now boot up your system once more. It will take longer than usual to boot up, and when it does, it will boot into the Retroid OS. Hold the HOME button and select “switch system” from the menu to be taken back to the regular Android OS.
Connect your Retroid Pocket to your PC, open the backup tools folder from earlier, then run the “RP2 Key Restore.bat” file. Your RP2 will then reboot automatically once the process is complete.
With this, you will have now completed the re-flash/upgrade process. Enjoy your fresh Retroid Pocket 2!
Conclusion
The first time you reboot into Android, there may be missing apps. If you leave the system for a short while, it will automatically start running a script to re-install the selection of stock apps on the device. After this is complete, it will reboot automatically.
We hope you have found this guide of use. If you have any further questions, or if something isn’t quite clear in the guide, please feel free to leave a comment, and we’ll address it as soon as we’re able to!
Until next time!
Purchase your very own Retroid Pocket 2 here: https://droix.co.uk/product/retroid-pocket-2/
