
Hi there! We at DroiX sell a variety of mini PC’s and laptops, and as with all electronics, sometimes things go wrong. You might be experiencing random crashes, or you might just wish to perform a round of “spring cleaning” and wipe the device. Whatever the reason, it is useful to know how to reinstall windows on your device of choice should the need arise.
To that end, we are compiling a guide that encompasses the general way that you might go around resetting your PC.
DISCLAIMER: Please make sure to remove or disable any storage devices are are not the target of the reinstallation. As any installation scripts may potentially target the wrong drive, causing an unintended complete loss of data. Please also backup any important data beforehand, as the drve will be wiped.
Downloads
The overall process for a reinstall is broadly the same across all of these devices. Prepare your USB, and boot into it.
Choose your device from the list below. If your device is missing, let us know, and we’ll prioritize uploading it ASAP!
MinisForum Firmware Download
If you’re only looking for the drivers, check out our collection of MinisForum mini PC drivers.
| Model | Firmware Link |
|---|---|
| UM250 DMAF5 UM700 | UM250, DMAF5, UM700 Firmware Download |
| X400 (Ryzen 3 & Ryzen 5) | MinisForum X400 Firmware Download |
| X35G | MinisForum X35G Firmware Download |
| GK41 | MinisForum GK41 Firmware Download |
| H31 H31G | MinisForum H31, H31G Firmware Download |
GPD Firmware Download
| Model | Firmware |
|---|---|
| GPD Pocket 2 GPD P2 Max | GPD Pocket 2, P2 Max Firmware Download |
| GPD Win 2 | GPD Win 2 Firmware Download |
| GPD Micro PC | GPD Micro PC Firmware Download |
| GPD Win Max | GPD Win Max Firmware Download |
| GPD Win 3 | GPD Win 3 Firmware Download |
Beelink PC Firmware Download
We have a range of Beelink drivers also available for download in our Beelink PC driver collection.
| Model | Firmware Link |
|---|---|
| AP45 | Beelink AP45 Firmware Download |
| T45 | Beelink T45 Firmware Download |
| L55 | Beelink L55 Firmware Download |
| U55 | Beelink U55 Firmware Download |
| X55 | Beelink X55 Firmware Download |
| BT3-X | Beelink BT3-X Firmware Download |
| J45 | Beelink J45 Firmware Download |
| MII-V | Beelink MII-V Firmware Download |
Other PC Firmware Download
| Model | Firmware Link |
|---|---|
| CK1 | DroIX CK1 Firmware Download |
| CK2 | DroiX CK2 Firmware Download |
Preparing the Installation Media
To reinstall windows on any device, you will need to prepare a piece of installation media. This will be a USB flash drive that can be anywhere from 4 to 16GB in size, depending on the files.
You will need to format the USB drive. This can be done using your operating system’s built-in formatting tool, or you can download a third-party partition management utility, such as MiniTool’s Partition Wizard.
When you format the drive, there are two things you must make sure of:
- That the partition is called WINPE
- That the partition is in the NTFS format
If the drive does not conform to these two rules, it will not function as a bootable drive.
Working with compressed files (.zip, .rar, etc.)
One way that firmware files will be distributed is in the format of a compressed file. This will be one or more files ending with an extension such as .zip, .rar or even .7z.
To access the contents of these compressed files, you will need to extract them. You can either use your operating system’s or you can use a third-party tool such as 7zip (recommended!) or WinRAR.
In Windows 10, to open .zip files, you can right click the file and select “extract” from the context menu. For other file types, such as .rar and .7z, you will need third party software (once again, we suggest 7zip!).
There are multiple compressed files? How do I extract multiple zip/rar/etc. files?
Occasionally, large downloads may be split into multiple parts. The main benefit of this is that it makes large files easier to download, because rather than download a huge chunk, you can download it in multiple “easier to digest” packages (so if you lose connection during the download, you don’t lose as much progress).
This does come with it’s own issues however, such as more potential locations for a download/upload to become corrupt.
Multi-part compressed files will often have suffixes like .001, .002, and so on. This indicates what part of the zip it is.
To “combine” the multiple parts, all you need to do is place all the parts into the same folder on your PC, and then extract the first one as you would any normal file.
Working with the contents
Inside the compressed file, assuming it is not an .img (in which case, skip to the Working with Images part of this guide), you will multiple files and folders, like so.
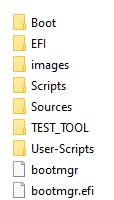
Copy all these files and folders onto the ROOT of your prepared USB drive. By “root”, we mean place the files directly. Do not put them all in one folder, and then place that folder onto the USB drive.
Rename the USB drive to “WINPE”, and now you’re ready to go!
Working with Image files (.img)
Sometimes firmware may be distributed as an .img file. An .img file is basically a snapshot of an already prepared USB which you will need to use a tool such as Win32 Disk Imager, or ApplePi Baker (for Macintosh users).
Some of the image files you’ll find in the guide are prepared by us at DroiX. Essentially, all we’ve done is follow the compressed-file part of this guide, and have turned it into an .img for you to use!
Either way, let’s continue…
Using Win32 Disk Imager
Win32 Disk Imager is a lightweight, powerful, and easy-to-use tool for both reading and writing image files.
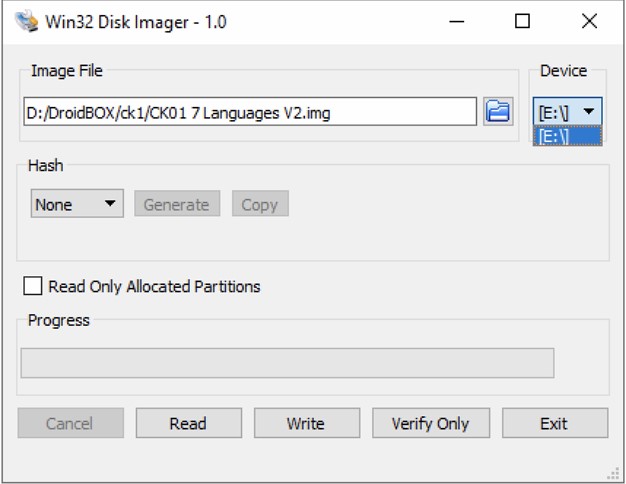
Make sure your USB drive is inserted, and you have the image file downloaded.
Under “Device”, select the drive letter that corresponds to the USB drive. If there is only one Hard Drive/Solid State Drive in your computer, the USB will probably automatically be assigned the drive letter D:\ , but make sure to check!
Under “Image File”, navigate to the image you downloaded previously. It doesn’t really matter where its saved, as long as you can find it (and it won’t be moved during this process)
Then, click “Write”, and the process will begin. This will probably take around 30 to 60 minutes depending on the speed of your computer and the connected USB ports (you can use the PC for other things in the meantime, just make sure not to disconnect the USB drive, add/remove any files to the USB drive or close the application!).
When the bar is filled and you get the popup informing you that the imaging is complete, it’s safe to remove the USB drive.
Booting into the USB
Now your USB has been successfully prepared, it’s time to actually use it to carry out the reinstall.
To do this, insert the USB into your PC or laptop. Then, while the USB or laptop is booting, press a certain key combination:
- To enter the BIOS on most devices, you will need to press one of the following: ESC, F1, F2, F12
- If you enter the BIOS, you will need to press left/right on your attached keyboard until you are under the “Save & Exit” menu.
- To enter the boot menu, on most devices you will need to press F7.
Now you will see a list of bootable devices. Select the one that conforms to your USB memory stick – for example, a Kingston USB stick might who up in the boot list as a “Kingston DataTraveller”. Select it.
The installation itself will now proceed automatically. Note however that there are some devices whose reinstalls require user input (a simple yes/no to confirm if you wish to proceed), so keep an eye out (so you’re not waiting around for longer than necessary!).
Misc Tips, Notes, Etc.
The Windows version looks a bit… old?
Most of the devices will likely have had their firmware created with an older distribution of Windows, most likely the 1909 update, or whatever was relevant when they have launched.
This is no cause for concern – simply update Windows when you’re most comfortable to do so.
A note about some Beelink models
Some beelink models may fail to install the first time you try to do so. This will most likely be the ones with the custom reinstall utility (instead of the command line appearing, a customized window with various buttons will appear), like so:
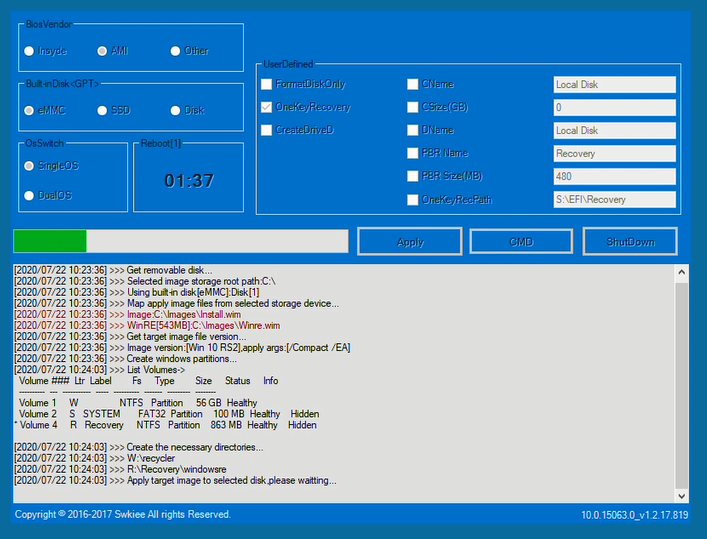
To fix this, change the target installation drive in the top left (Built-inDisk <GPT>) to eMMC or SSD depending on the model, so that the reinstallation will be carried out on the internal storage. Then hit “Apply”.
My firmware isn’t in the list above!
If you can’t find the firmware for your mini PC above, then there’s two courses of action you can take.
First, you can try using a generic Windows 10 installation (or 11 if applicable). You can find the latest version of Windows 10 here.
Second, you can try to download firmware and drivers directly from the online repositories of the manufacturers themselves.
Beelink maintain their own support site, as do GPD and MinisForum respectively.
