
In this article
Sometimes, it’s nice to just have a fresh start. Sometimes, it might even be necessary to have a fresh start. Whatever the reason may be, from simply wanting to de-clutter your PC, to wiping the system after a virus or other dodgy program messes everything up, it’s a fairly straightforward process to reset your CK1/CK2.
All you’ll need is the following:
- A USB Flash Drive that’s at least 8GB in size
- Warning: Make sure to move any important files off of this USB Flash Drive before proceeding, as all data on it WILL be wiped.
- The CK1 firmware, which you can download here (or the CK2 image here)
- Any form of disk-imaging software.
- For this guide, we’ll be using Win32DiskImager
To begin with, you’ll need to…
Download The CK1/CK2 Image
In case you missed it above – the link is here in its full form too:
Got it all downloaded? Good, now we can move onto…
Preparing The USB
If you know what you’re doing and are using imaging software of your own choice, you can skip this part.
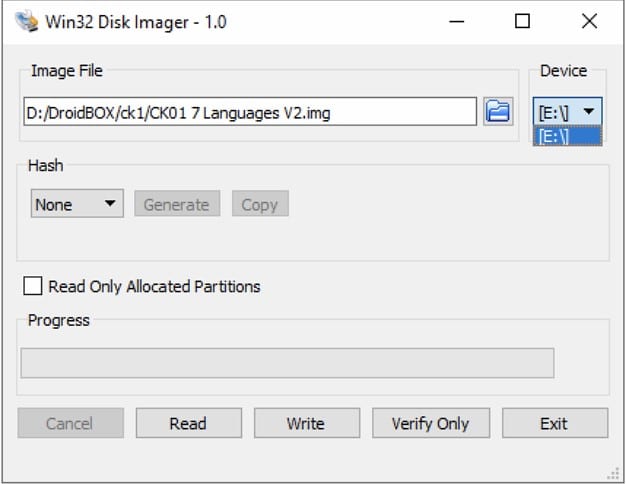
For everyone else, install Win32DiskImager via the above link(s), and then run it. You’ll be met with a screen like this:
Make sure your USB drive is inserted, and you have the image file downloaded.
Under “Device”, select the drive letter that corresponds to the USB drive. If there is only one Hard Drive/Solid State Drive in your computer, the USB will probably automatically be assigned the drive letter D:\ but make sure to check!
Under “Image File”, navigate to the CK1/CK2 image you downloaded previously. It doesn’t really matter where it is saved, as long as you can find it (and it won’t be moved during this process)
Then, click “Write”, and the process will begin. This will probably take around 30 to60 minutes depending on the speed of your computer and the connected USB ports (you can use the PC for other things in the meantime, just make sure not to disconnect the USB drive, add/remove any files to the USB drive or close the application!).
When the bar is filled and you get the popup informing you that the imaging is complete, it’s safe to remove the USB drive.
Installing Via USB
Now that your USB drive is prepared, you can use it as many times as you’d like, so if you reset your CK1/CK2 often, it might be a good idea to leave this drive lying around.
To begin the installation process, make sure that the CK1/CK2 is powered off, then insert the drive.
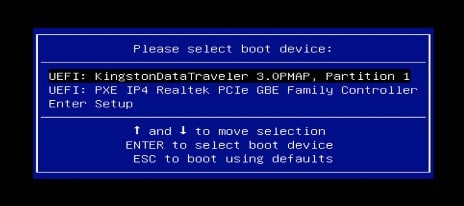
Once inserted, power on the CK1/CK2. Repeatedly press the “F7” key on your connected keyboard as it is booting up until you’re met with this screen:
(If you missed it, you were probably too slow. Just turn off the PC and try again!)
The contents of this menu may differ depending on what’s plugged into the PC, but all you will need to do is select the one that matches your USB drive (for example, we have used a Kingston-brand USB to make this guide, so the one we’ll be selecting is KingstonDataTraveler).
The installation will then proceed automatically. If the command prompt asks for any input, just agree by typing “y”.
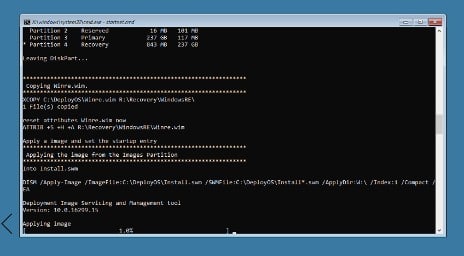
Once the installation is complete, the computer will shut down automatically.
Preparing Windows
When you turn on the PC for the first time after reinstalling, it will launch into System Preparation Mode, which allows you to use a limited version of Windows 10 via a temporary account before starting the fresh installation for real. There will also be some sample programs and files present that can be used to troubleshoot the PC’s performance – these will all be uninstalled automatically later on.
There will also be a window that pops up automatically – the System Preparation Tool (if you close it, you can find it again at C:\Windows\System32\Sysprep )
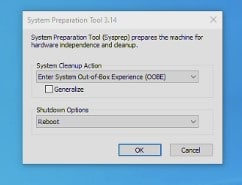
After you’re done performing whatever quick checks you need to, make sure that the “System Cleanup Action” selected is “Enter System Out-of-Box Experience (OOBE), and that the Shutdown Option is set to Shutdown (if you intend to start it up later), or reboot (if you plan to start it up right now). Then select “OK”.
Your computer will now either shut down or reboot, and when it starts up again,
